Taking A Gander At The Brother Ads 4300 N
I don’t think my room has changed at all since I moved here in the early 2000s. Have I decided to move things around? Sure! Have I replaced the objects that broke? Yes! However, when it comes to documents from school, personal finances to Christmas cards, I (should) still have all of them somewhere here. This means that I have papers in my room that are over 20 years old and not really doing much. I strongly believe, that reading and writing on physical paper is superior to electronic copies in the majority of cases, however I have finally got the idea that keeping ALL of them is just not scalable to maintain.
Regardless, I still do want to keep and organize the papers I have for when/if I do need them in the future. Consequently, I have come up with an idea that the German government could never come up with… Digitalization!
To combat this task, I wanted to create the most optimal setup for scanning 1000s of pages without breaking my back. After taking a while to research the topic (a story for another time), I finally concluded with buying an automatic document feeder (ADF) scanner. More specifically, the Brother ADS-4300 N 1.
The main points which made me select it are the following points:
- Native Linux support through SANE
- Ethernet port (!!!!)
- No screen, dedicated physical buttons instead
I was very unsure of how good the scanner would be as this particular model has barely any coverage on any internet forum other than the official brother pages. Overall, the scanner is placed in the middle of the line-up of Brother’s ADF scanners with the “upgraded” scanners ditching Ethernet for Wi-Fi and including a front touch screen (An absolute recipe for disaster!). Because of this, I thought it would be nice to give a short initial impression of the scanner after scanning about 5 full binders of paper.
The scanner was easy to get out of the box and came with everything that you need to get going other than an Ethernet cable (which I fortunately have plenty to spare). While the physical setup was easy enough, it turned out to be slightly more challenging on the software front. The included manual gives basic information on what the different lights do on the scanner itself, but for using it from a PC or phone, it promptly points you to an online setup. Although I have not tried, I am sure that all the mainstream operating systems have an easy enough interface provided by the applications downloaded through this method.
However, from the point of view of a Linux user, there are no further instructions after downloading and installing the drivers for USB and network use. You can also access some scanner setup options by connecting to the scanner directly through its HTTP frontend. The web interface first tries to get you to install a cert to enable HTTPS which makes sense given the features that the description page boasts. However, this of course is always a bit suspicious as you are trusting your security in a certificate that you did not create yourself. Fortunately, you can also generate your own and import it through the admin portal. Here you also have access to set up FTP/SFTP connections and change the 3 custom buttons at the front of the machine. I have not tried this yet, but this looks quite convenient, as I am able to set up the custom buttons for family members so that they only have to press a button to get the result they want.
Where I have used the scanner is through the SANE interface.
Having not tried out SANE before in my life, I was expecting a slight difficulty bump to the process. Luckily, the Arch wiki 2 saves the day and provides very simple instructions on application frontends for SANE and the CLI options. I started out by using a GUI frontend where I could check quickly test out quality settings and see what is best for which content. I personally had the best GUI experience with gscan2pdf where it was just intuitive to use without reading any man pages. After I was happy with the performance, I decided to check out the command line interface (CLI) to see if scripting was an option to me. As is tradition, the Arch wiki 2 saves the day and provides very simple instructions on the types of commands to expect through SANE.
Overall, I decided to dig deeper into the CLI option and found it to be the easiest and simplest option to take full advantage of the scanner. For reference, below is an image of the options provided by the brother scanner directly:
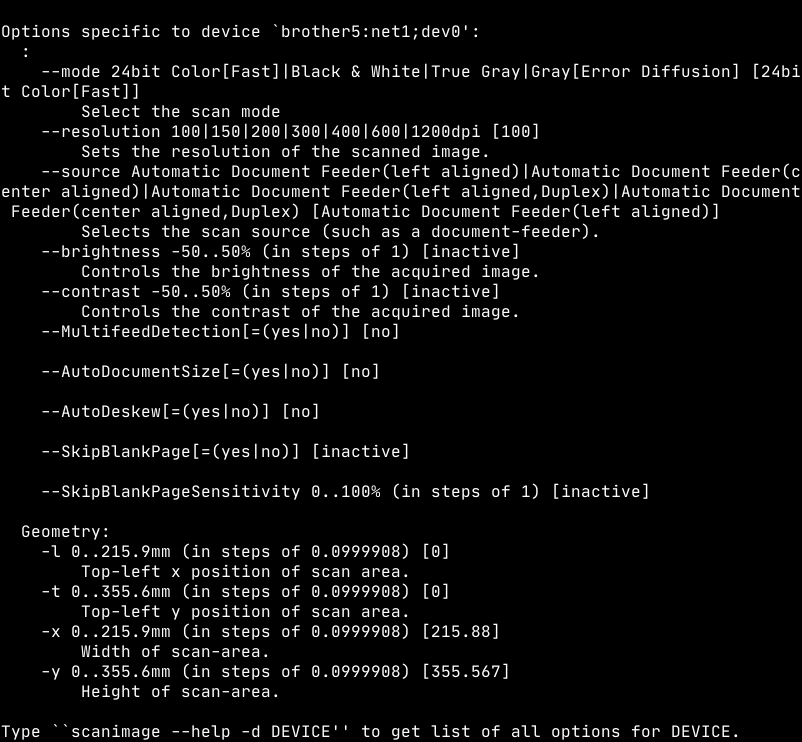
With these options, it is easy enough to get a good archival scan by typing:
$ scanimage -d "$BROTHER_SCANNER" --format png --resolution 300 --MultifeedDetection=yes --AutoDocumentSize=yes --AutoDeskew=yes --batch "%d.png"
With all these options available, I created a simple script that creates
optimal defaults considering the scan type (archive document, image print,
receipt, etc…) with the option to override them through command flags. What
this means (as seen in the command above), is that I can execute bscan archive to scan the documents at
300 DPI, in colour with the document auto cut and aligned as one would expect in
an archival version. The scanner works perfectly with the script, and it was a
delight to see everything run so smoothly! All I can say is that I am chuffed!
DISCLAIMER: The image examples given in this section have been heavily compressed to keep the website small. If you would like some full size examples, feel free to contact me.
My first impression of the scanning process is generally very positive. I load up the documents I want to scan, I type my command for the specific quality settings and off it goes!
I am doing everything through an Ethernet connection (PC and scanner are both connected via cable). The time it takes for the scanner to react is almost instantaneous.
Side Rant: If I compare this to the older Brother printer that we also have here (Wi-Fi only) it is night and day. I really don’t get why you would want to equip a stationary tool with Wi-Fi over Ethernet. Once again I just have to ask what went wrong when they decided that the “higher end” models are only equipped with Wi-Fi.
The only part I did not expect to be slow is the actual processing of the scans and the transfer back to the PC. While I do believe that the scanner can do 40 pages a minute (I have not tested this, perhaps I should), the processing of the pages takes quite a bit longer and so my terminal is hung up a while longer while the pages load. This is perhaps not a too bad of a problem though, since removing the scanned documents and loading new pages usually takes long enough for the processing to finish.
Since this is the first ADF system that I have bought for home use, I can not really compare the quality between competitors or other models. Nevertheless, I found that the scanner does do a good job with documents. Even when taking 300 DPI PNGs (my default setting for archive mode), the only way to see compression artifacts and individual pixels is to really zoom in! The contrast between the white paper and the colour on top (even faint colours like red or light pencil) show even better on my monitor.
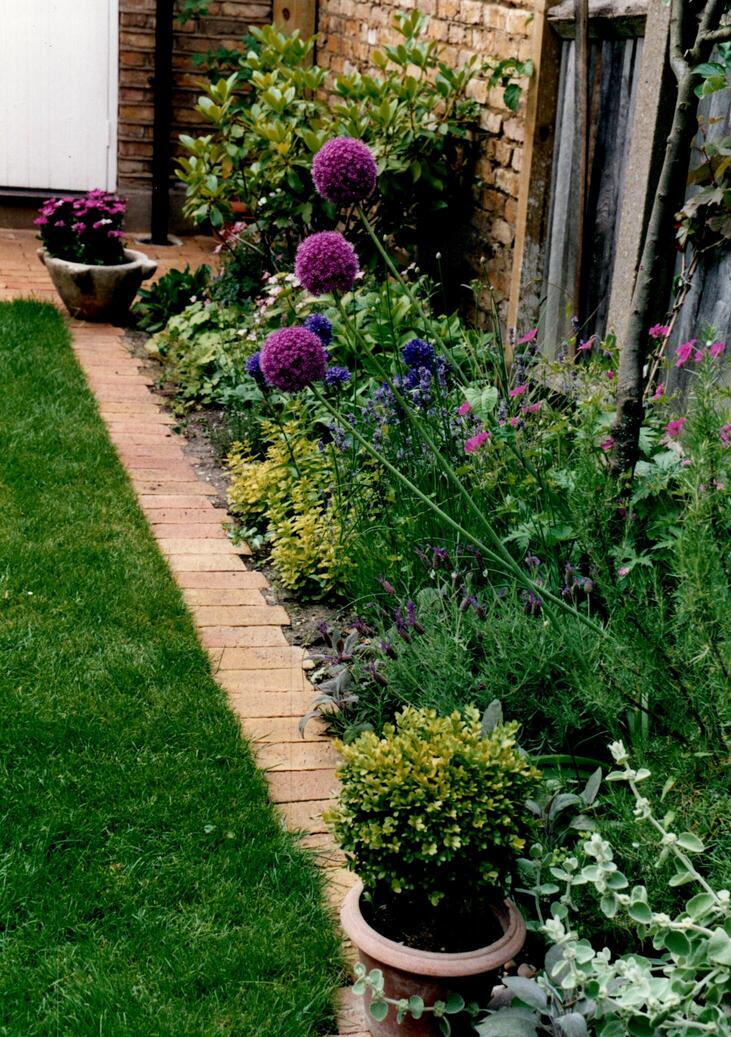
In addition to documents, I also tried scanning old printed images where the negatives were thrown away ( Please don’t throw them away :-( ). The pictures tested were printed on pretty standard glossy 4” x 6” photo paper. Initially, I was worried that the feed would not be able to separate the pictures, and it would cause problems with feeding them through. To my surprise, after entering my specific “photo scan” command, they just went through normally one by one. The results of these scans were a bit more mixed. The images with a lot of light positively surprised me with how decent it looked. On the contrary, images which were more dark had more problems with getting details compared to the original. In addition, some images were not cut properly and so the scanner bed can sometimes still be seen in the file.
The one factor that I did not think about before purchasing an ADF, is the maintenance that is required for the best quality scans (Not the fault of the product itself). In hindsight, I perhaps was being a bit too naive. When I set it up, I immediately placed a dust cover over the scanner to prevent any from going in. However, what I did not think of is all the paper dust(?) that is on the paper itself. Whether this is due to the age of the paper that I had placed into the scanner, or if it has to do with the quality of paper that I used in some of my binders is not clear to me. Regardless, the scans can be affected by this “paper dust” that sometimes places itself on the scanner portion. This can create very small and then black lines on the scan which can be annoying on some more important documents that you want to be kept perfectly. Interestingly, the dark streak sometimes fixes itself after more paper is fed through, but I also got used to opening up the scanner and giving it a good clean with microfiber cloth and my Rocket air blower.
Other than that, my first impressions remain very positive. Especially coming from a Linux background where companies usually just don’t care about the operating system, the implementation in SANE was the best solution that Brother could do! My next task is to really put the scanner to the test. I still have boxes full of binders and photos to be scanned before I can really make my final judgement on it, but I can tell that this will be a project that will be ongoing for another while. I will probably comment on those results again.